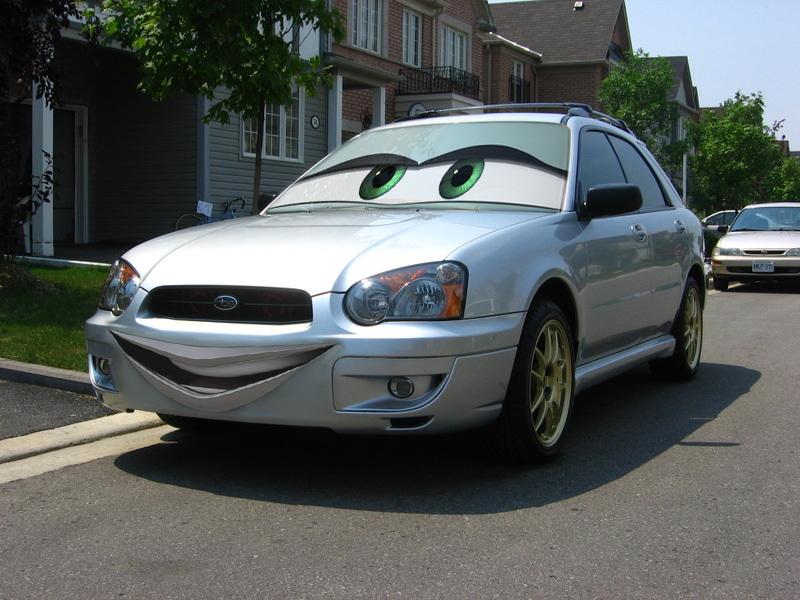
Step 1: Get a 照片 of your car,something medium resolution is good, if the 照片 is two low then the cars parts will look odd, if its a crazy detailed , the final product will look 更多 fake. The 照片 im using is at the bottom of the screen.
Step 2: Go to the cars 壁纸 site-- link and find a car mouth and eyes that suit your picture. It dosent mater if the car is facing left 或者 right, 或者 the perspective angle, we can change all that later. for this one i'm using Flo. Open this 壁纸 at the highest resolution.
Step 3: with your CARS 壁纸 and using the freehand laso (newbies) 或者 pen tool select a large area around the mouth. Make sure 你 include all the mouth corner lines. this selection dosent have to be perfect.
Step 4: Drag the mouth to your car photograph and set the opacity to around 75%
Step 5: If your mouth is backwards (as in this case) go to the 编辑 menu> transform> flip horizontal. Now comes the hard part: using the transform functions (rotate, scale, and a lot of perspective) drag the mouth around so it covers the area of your front bumper. I find it easier to use the foglight holes as a reference, putting the edges of the mouth just a little bit over the inside crease (blue) just make sure 你 pay attention to the bottom and sides of the mouth (red) and that the perspective of the mouth fits the perspective of the car
step 6: go back to your 壁纸 and using the plygonal lasso select a general area around the eyes/windshield. again this selection dosent have to be perfect just make sure you're outside the windshield:
Step 8: Drag the eyes over to your 照片 and set the opacity to 75%. Ok, as with the mouth 你 have to use the transform tools (rotate, scale, A lot of Perspective) to fit the windshield around your own windshield (pat attention to the perspectives! (blue lines) this will make the differance between something that looks realistic and something that looks stupid) Pay attention to the eyebrows, make sure the color goes all the way to the 最佳, 返回页首 corners (red) make sure your eyes
Step 9: hide the visibility of the eyes layer (the little eyeball in the Layers Pallet) and very carefully using the magnetic laso 或者 Pen tool select around the edge of your windshield. 你 want to select under your windshield wipers. Then go up to the menu Select>Feather and set that to 2 或者 3 pixles (a little 更多 if your using a big file)
Step 10: Select the inverse (ctrl+shift+I) and without deselecting anything, click on your CARS eyes, make it visible again (the little eyeball) and press delete. this should trim around the edge and make the eyeballs fit your windshield, Now 你 can play with the opacity, to preserve the reflections in the windshield I think about 85% is good.
Step 11: Going back to the mouth, make sure 你 have the brush pallet open (Press F5) and select the eraser tool. pick a fuzzy brush (see below) thats about 10% the size of the mouth, start erasing around your mouth to remove all hard edges, make sure 你 don't erase any of the actual mouth.
Step 12: Set the opacity of the mouth back up to 100% and using progressively smaller fuzzy brushes erase the rest of the color that covers the fog lights, grill, under the bumper, headlights. basically everywhere that isn't solid paint. (Red)
Step 13: Go to Image>Adjustments>hue and saturation and change the color of the mouth to the color of your car, If 你 have a black white 或者 silver car dont just change the saturation to zero! there are about a million reflected 颜色 in your paint, look at whats most domminant (usualy a light blue) and keep a little of this color in your mouth.
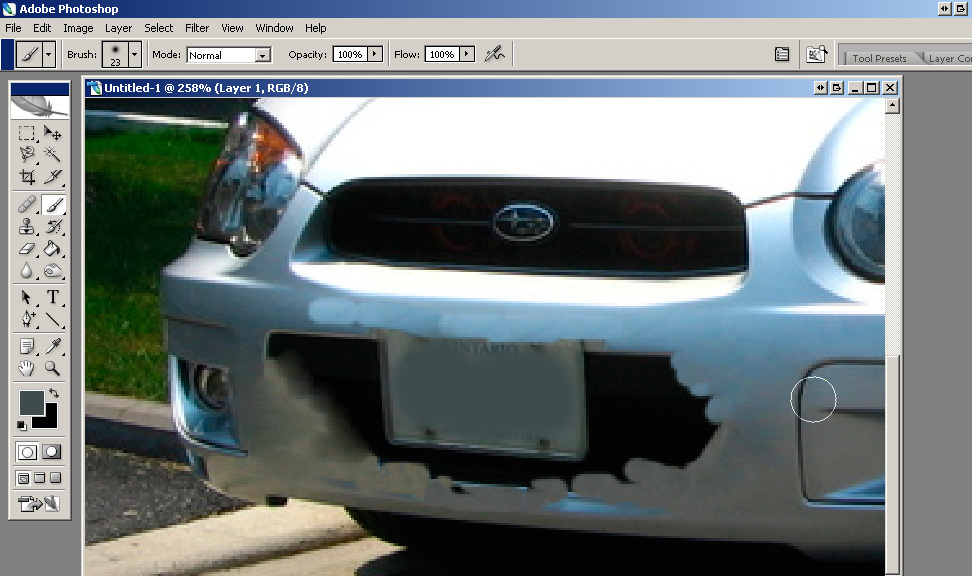
Step 14: youll notice that 你 can still see some of the grill under the mouth, the best way I've found for getting rid of this is tedious. going back to your car 照片 and using the healing and clone stamp tools. If 你 arent comfortable with these then using another fuzzy brush and painting in some of the color of your car over the hole will also work this takes a pretty long time, I usualy try to clone the piece of the bumber between the fog lights and grill and use vertical strokes to cover the middle. heres an in process shot:
Step 15: Go back up to the eyes and make a general selection around the eyeballs, then feather it out (like before) about 5 pixels, Then select the inverse again (ctrl+shift+I)
Step 16: Do the same color adjustments as on the mouth and then 你 should be done!